In this guide, we will walk you through the process of committing the nCino component, deploying it, and understanding data templates in nCino. We will also cover the steps to create and deploy data templates, as well as explore what data sets are and their use cases. Let’s dive in and explore each of these essential topics in detail.
What is nCino Data Template Package?
The nCino template package, available in the DevOps Exchange, needs to be downloaded by the customer to obtain the ready-made template for integration into the Copado environment. The nCino data templates provide a convenient way to deploy extensive sets of data that include different nCino features and their associated records. These templates make it easy to transfer functionality from Production and Full Copy Sandboxes to new Sandboxes, as well as deploy configuration data between sandboxes and Production Orgs. In simple terms, the templates allow you to effortlessly move important data and settings across different environments, ensuring a smooth transition and consistency across your nCino system.
How to Import nCino Data Templates from DevOps Exchange?
To import a data template into your Copado org, start by visiting the Copado Success Community and accessing the DevOps Exchange. Search for “nCino BOS Data Templates” in the exchange and click on “Get it Now” to install the package locally. Once the installation is complete, unzip the folder containing the templates. Now, go to the App launcher in your Copado org and search for “Data Templates.” Click on the “Data Templates” option to access the functionality. From there, follow the provided instructions to import the desired data template into your Copado org. These steps will guide you through the process of seamlessly importing data templates and leveraging them within your Copado org.
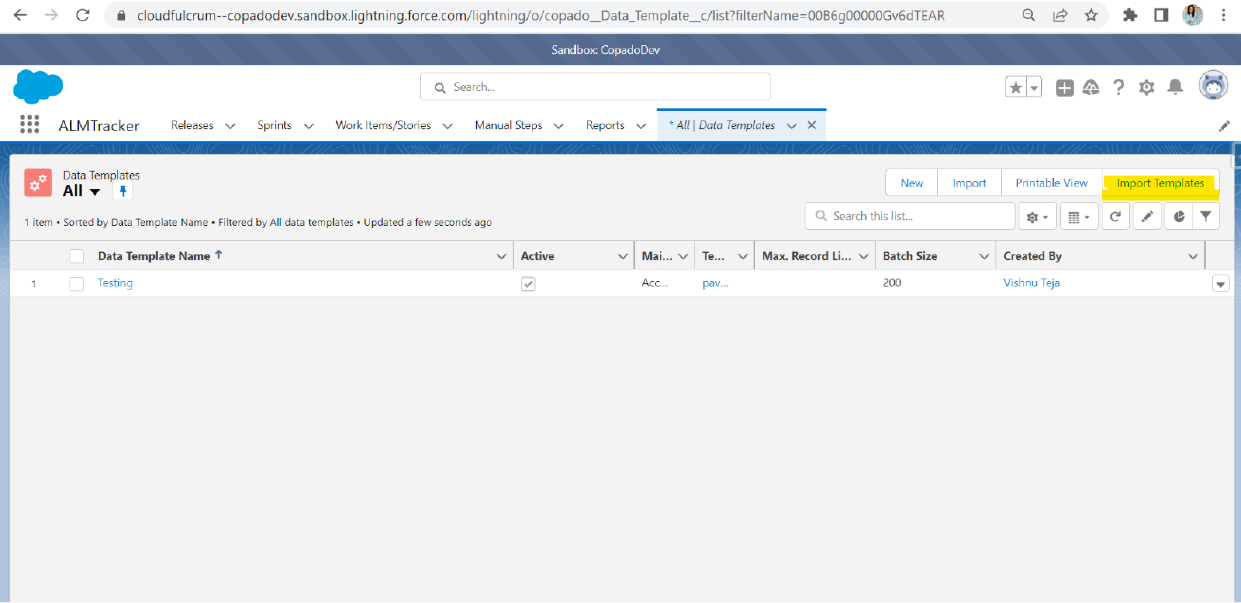
1. Go to the Data Templates tab and click on “Import Templates”.
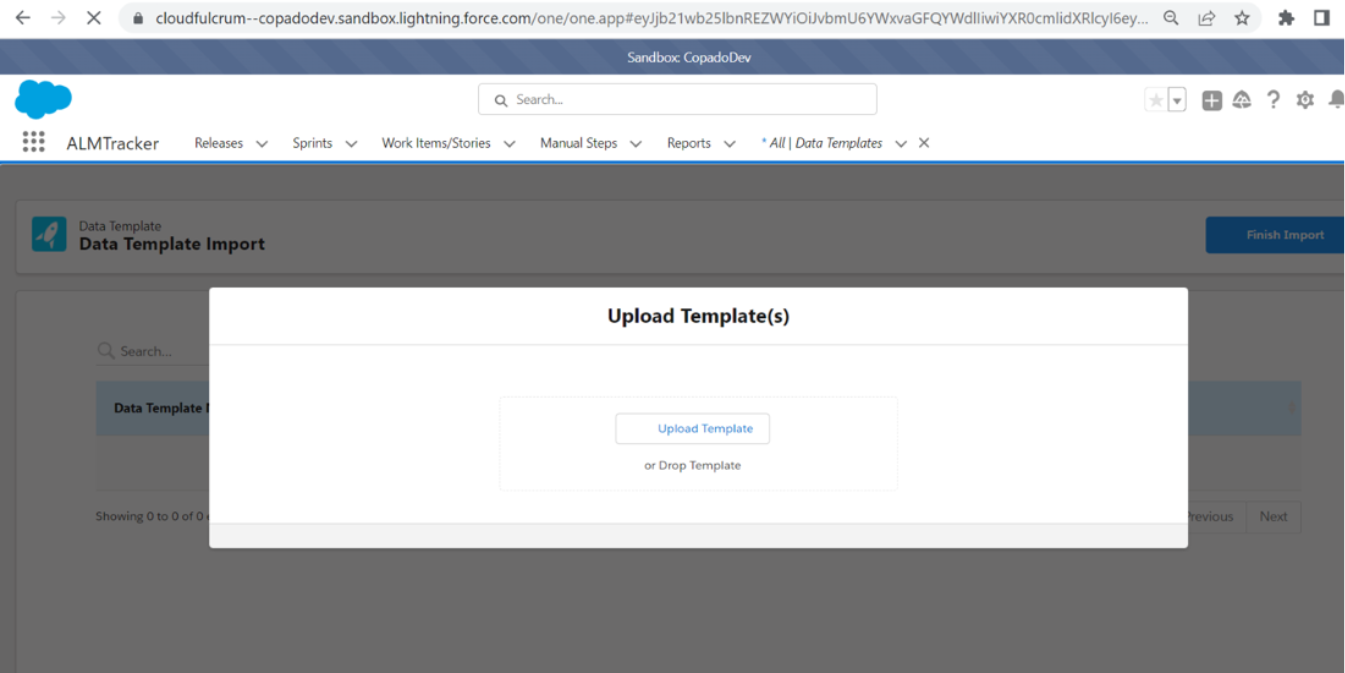
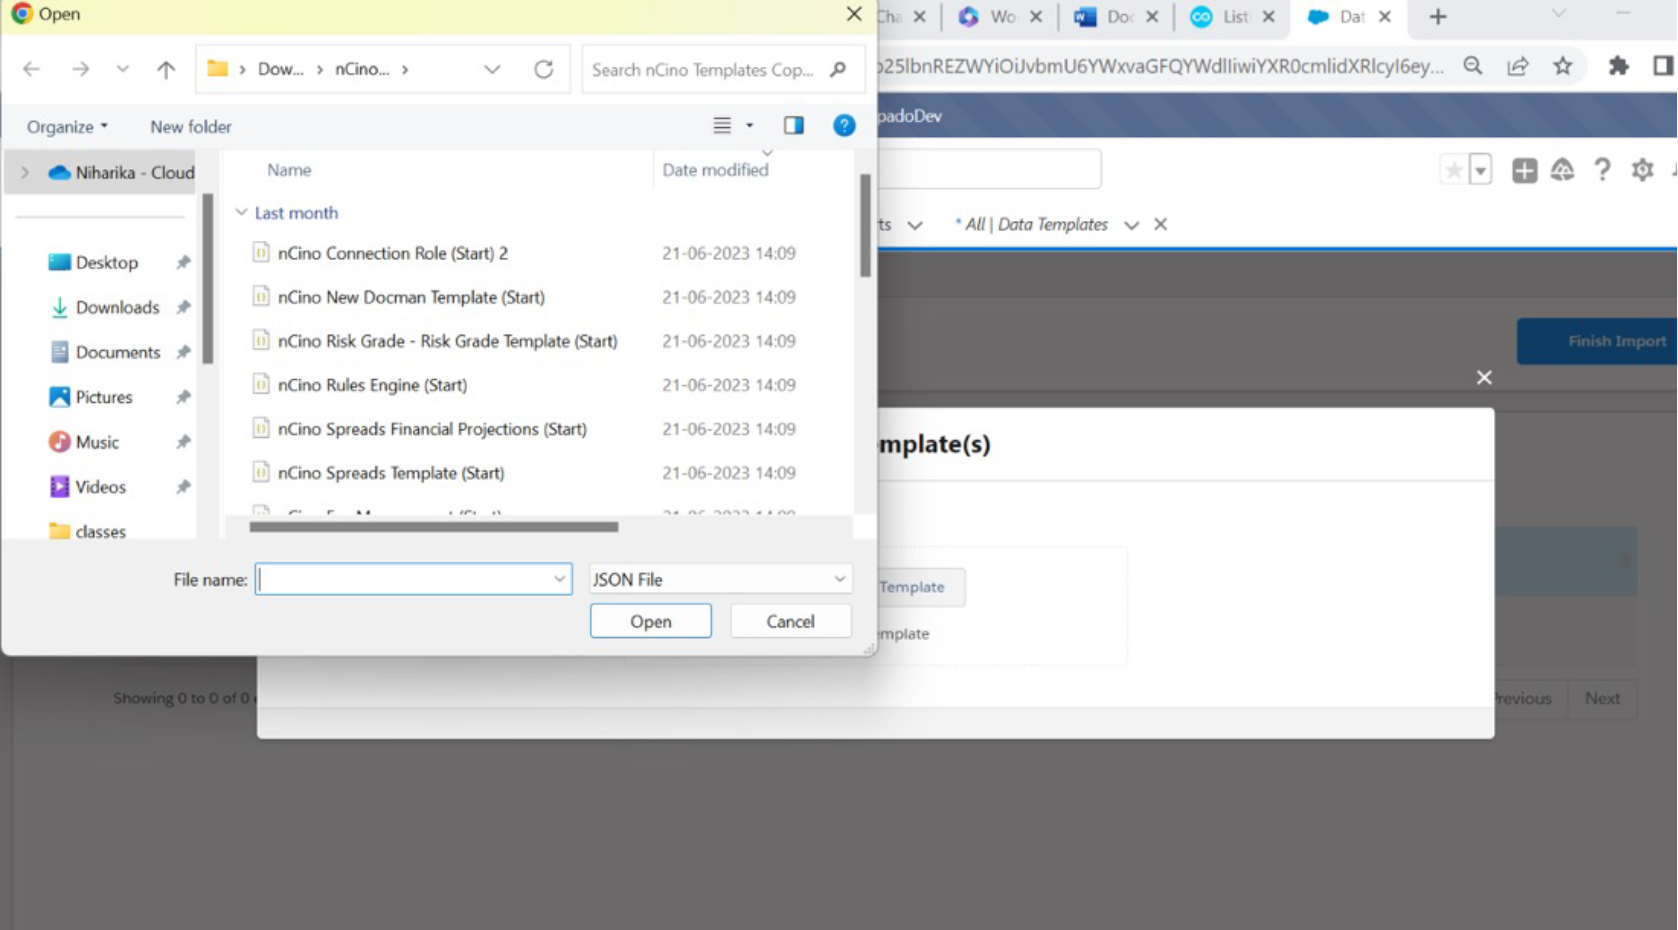
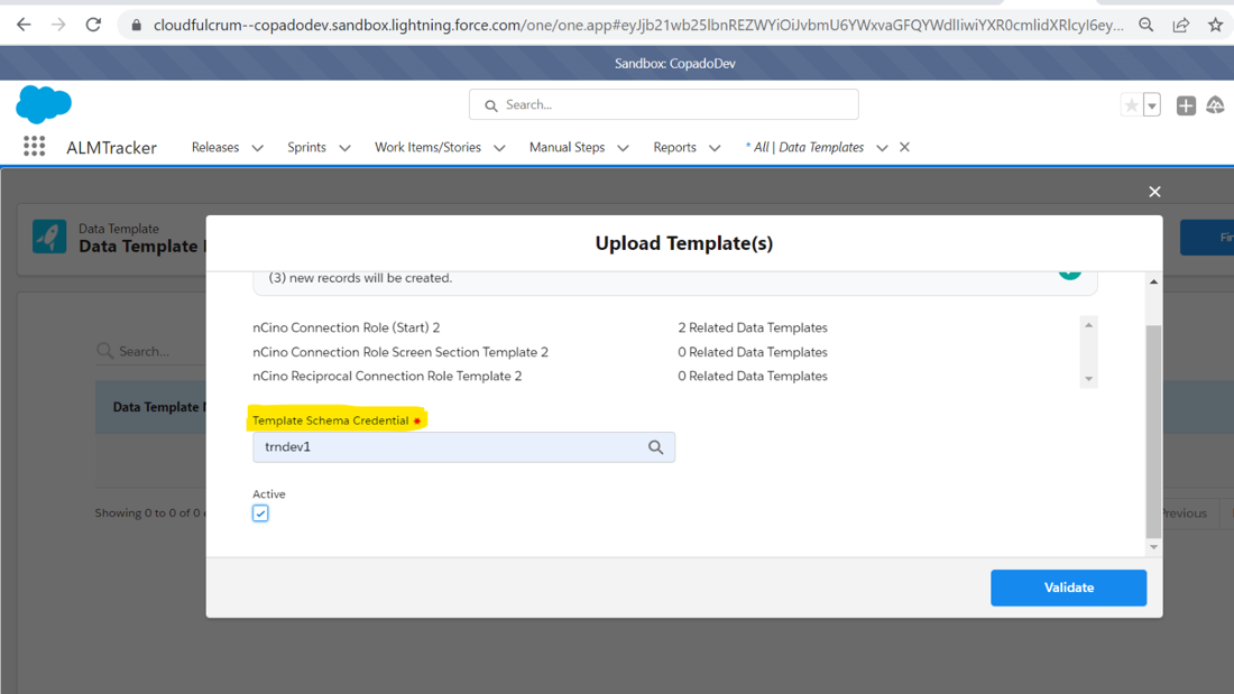
2. Click on “Upload Template(s)” and select the JSON file of the data template you want to import. Copado will create the corresponding data template records.
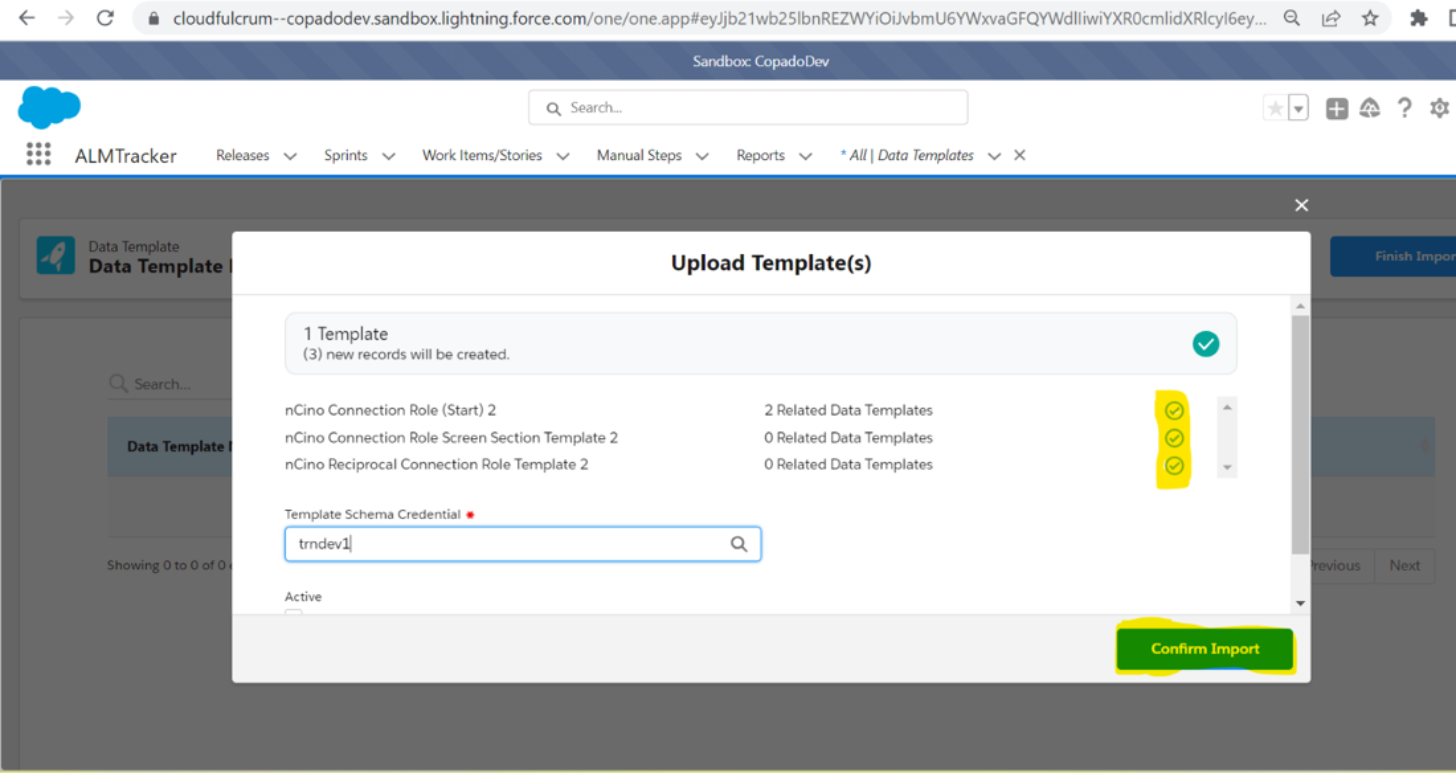
3. Once the import process is complete, a list of imported templates (including parent and related templates) will be displayed. At the bottom of the page, you will find the “Template Source Org” lookup field. Select the source org for the main template and its related templates.
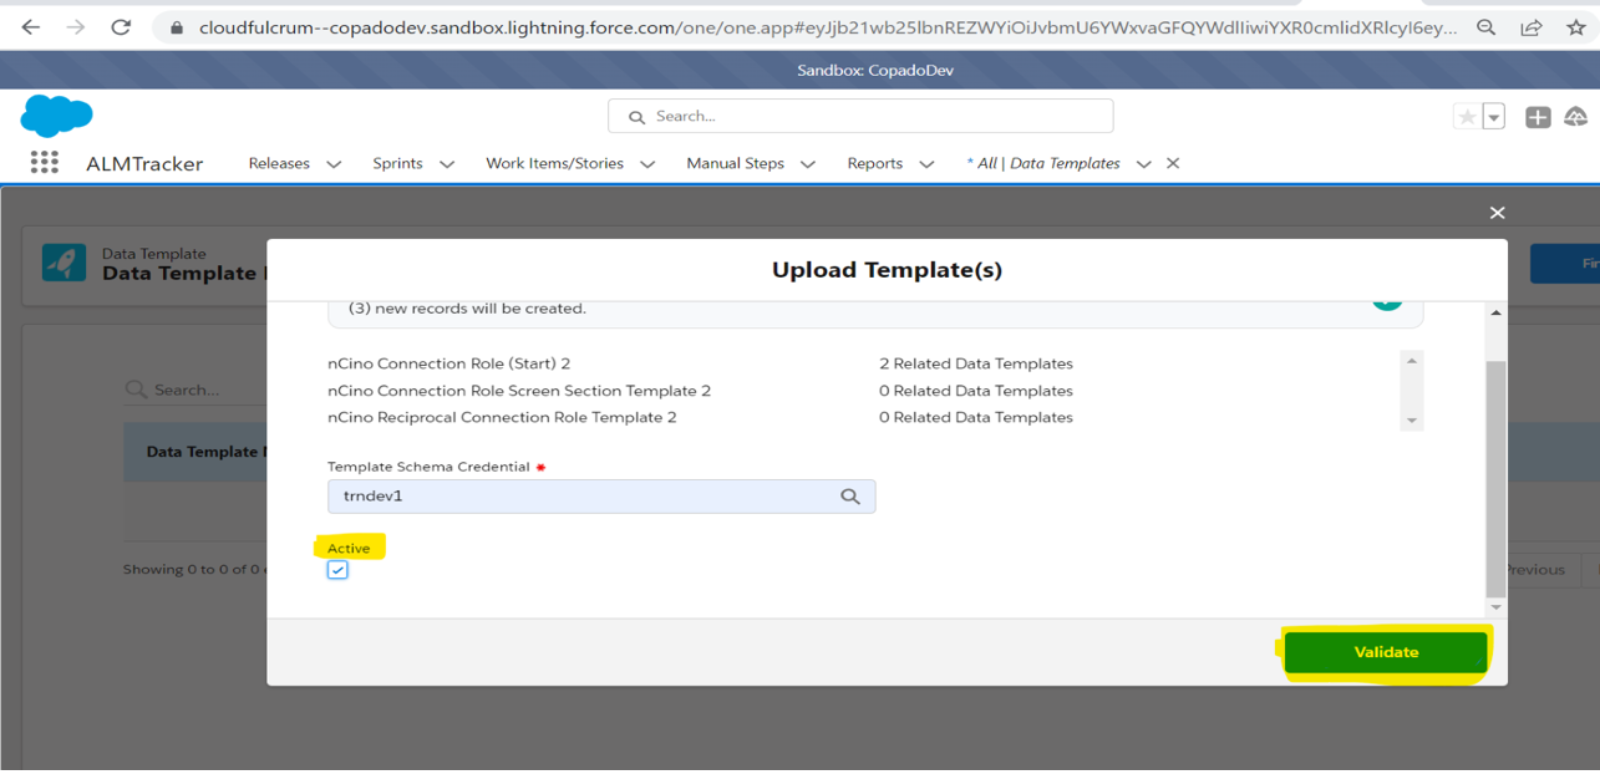
4. If you want to activate the templates, check the “Active” checkbox, and then click on “Validate”.
5. After validation, click on “Confirm Import”.
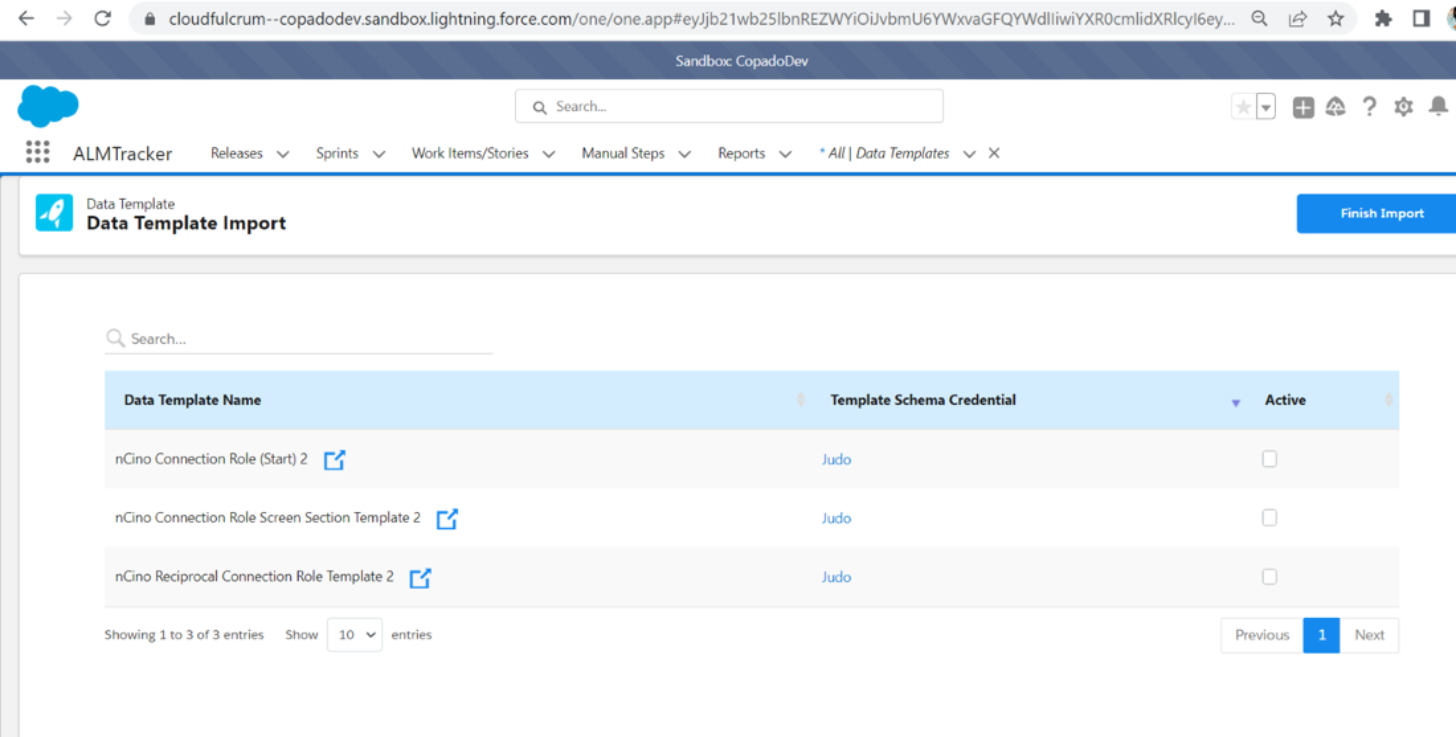
6. You will be redirected to the Data Templates Import confirmation page, where you can review and open all the imported data templates.
7. Finally, click on “Finish Import” to exit the page and return to the Data Templates tab.
The benefits of using nCino data templates are:
1. Ready-made template: The template package offers a pre-built solution that saves time and effort, eliminating the need to create the template from scratch. This accelerates the integration process and reduces development efforts.
2. Effortless Deployment: The data templates simplify the process of deploying comprehensive record-based data. They provide a straightforward way to transfer functionality from Production and Full Copy Sandboxes to new Sandboxes, saving time and effort in setting up the desired data structure.
3. Seamless Sandbox Migration: With data templates, migrating data between different sandboxes becomes seamless. You can easily move configuration data from one sandbox to another, ensuring consistency and reducing the risk of errors or discrepancies during the migration process.
How to commit the nCino Component?
To commit the nCino component, follow these steps:
- Click on “Object Manager”.
- Search for the nCino-related objects such as “Screen,” “Group,” “Route,” “Spread,” etc.

- Make the necessary changes to the object.
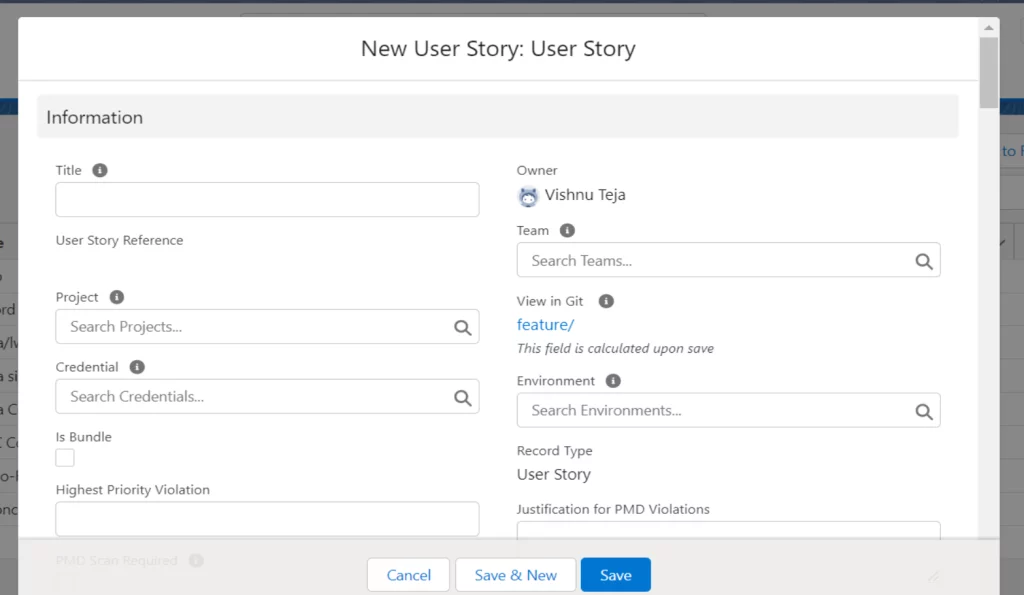
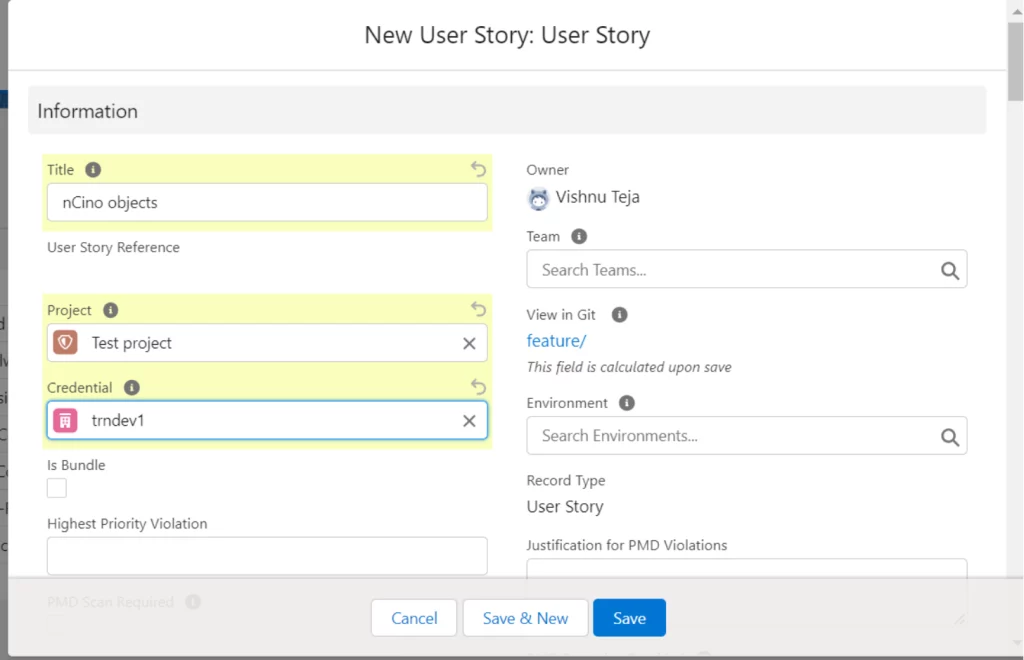
- Go to the App Launcher and select the “User stories” tab.
- Click on “New” to create a new user story.
- Fill in all the required fields and click on “Save”.
- Click on “Commit Changes,” which will redirect you to a page where you can commit the components.
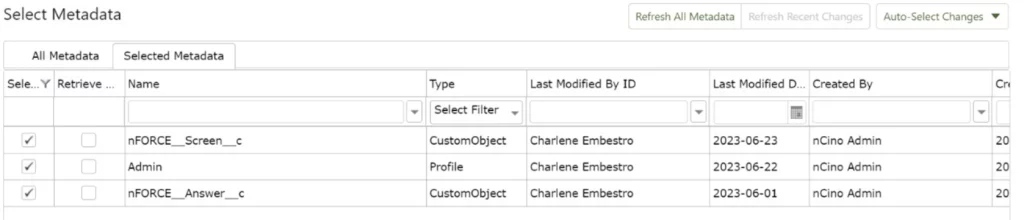
- Since these are new changes you made, click on “Refresh All Metadata”.
- Search for the components in the “All Metadata” section.
- Select the required metadata and commit the changes.
- Your user story will be successfully committed.
How to Deploy the nCino Component?
To deploy the nCino component, follow these steps:
- Go to the “Deliver” tab in the User Story.
- Locate the “Promote and Deploy” checkbox.
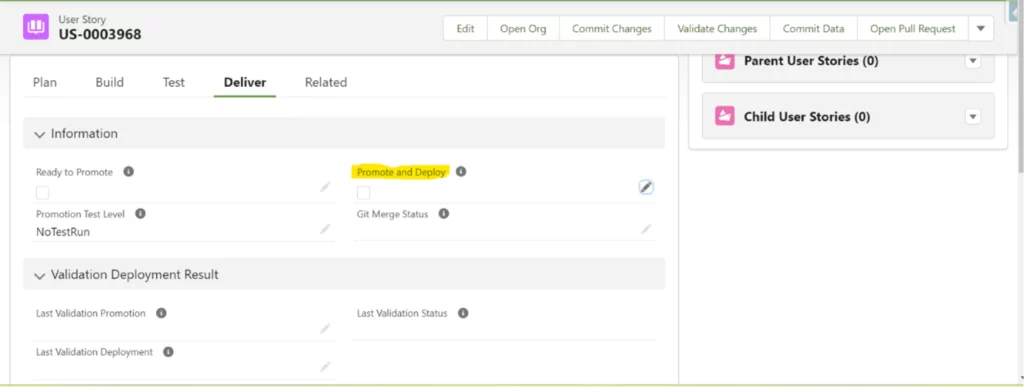
- Check the checkbox, a Promotion will be created and Deployment as well.
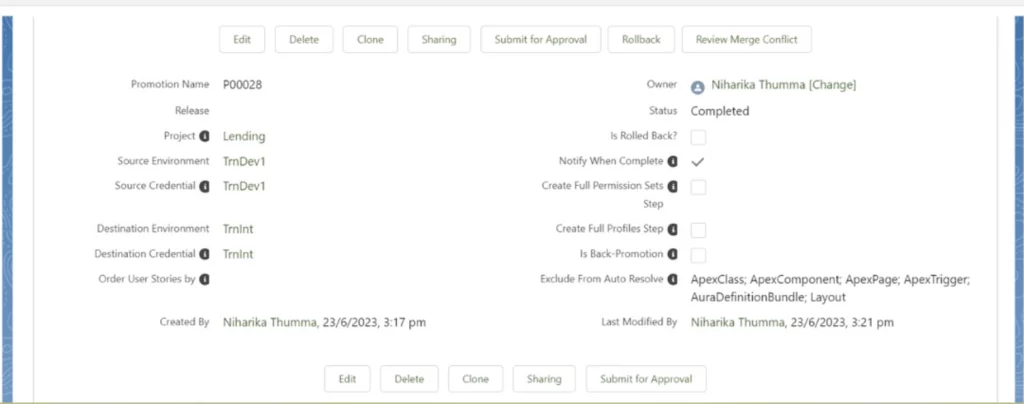

- After the deployment process is complete, your changes will be deployed to the specified destination.
What is a Data Template?
A data template is a configuration file that defines the data structure you want to migrate between your Salesforce orgs. You can configure a data template for the main object, related parent, and child objects. It is recommended to create one data template per object.
How many types of Data Templates are there in nCino?
nCino provides two types of data templates:
1. Standard nCino Data Templates: These templates are defined by nCino specifically for Copado.
2. Customized nCino Data Templates: These templates can be built based on the specific requirements of the user.
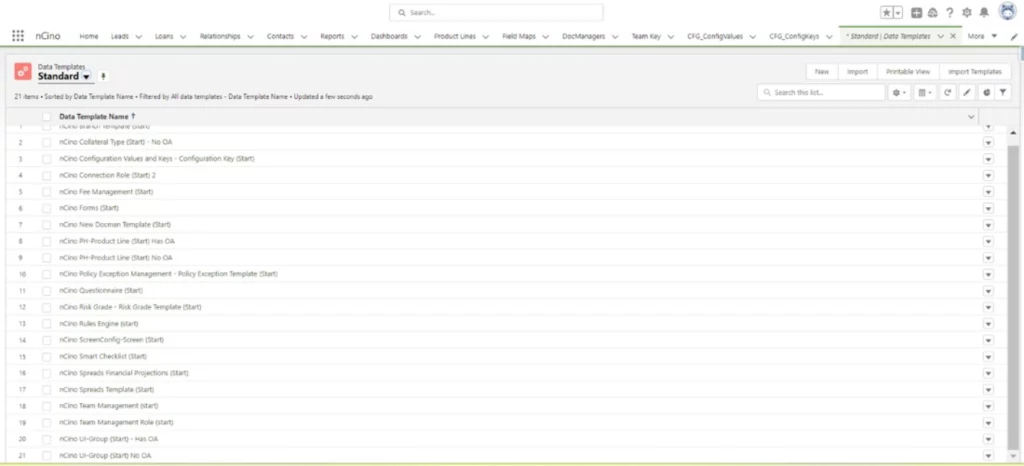
How to create the nCino Data Template?
To create the nCino Data Template, follow these steps:
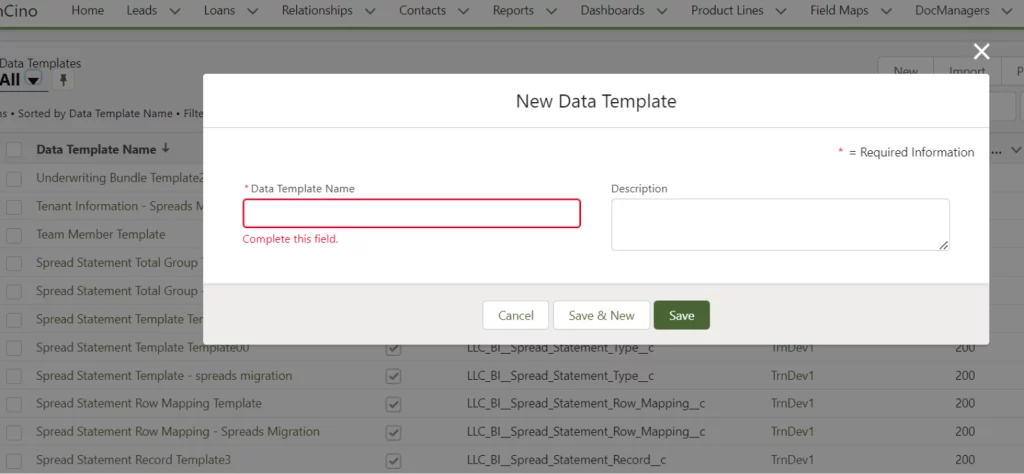
- Go to the App Launcher and search for “Data Templates”.
- Create a new template and provide the required data.
- You will be redirected to a page where you need to define the data schema.
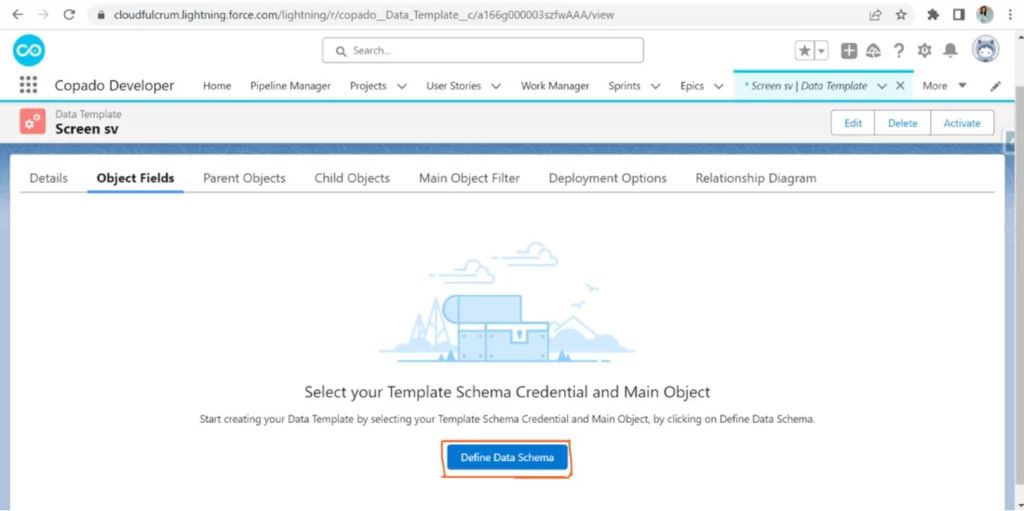
- Select the main object based on the defined data schema.

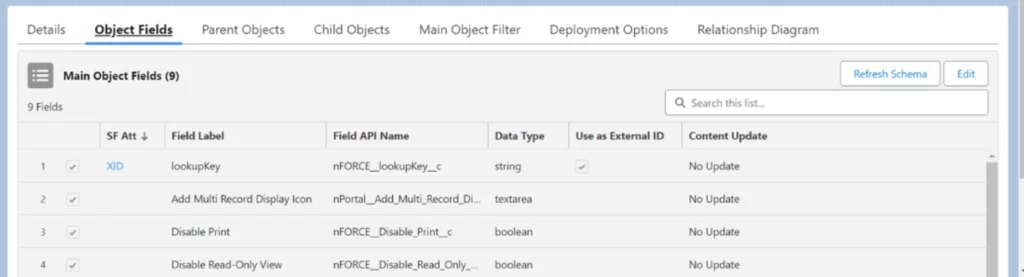
- View the object fields available in the template schema credential of the given sandbox.
- If you have clarity on the relationships between the objects, proceed with the object field mappings.
- If you are unsure about the relationships, go to Setup and search for “Schema Builder”. Add all the defined objects in the Schema Builder to understand their relationships.
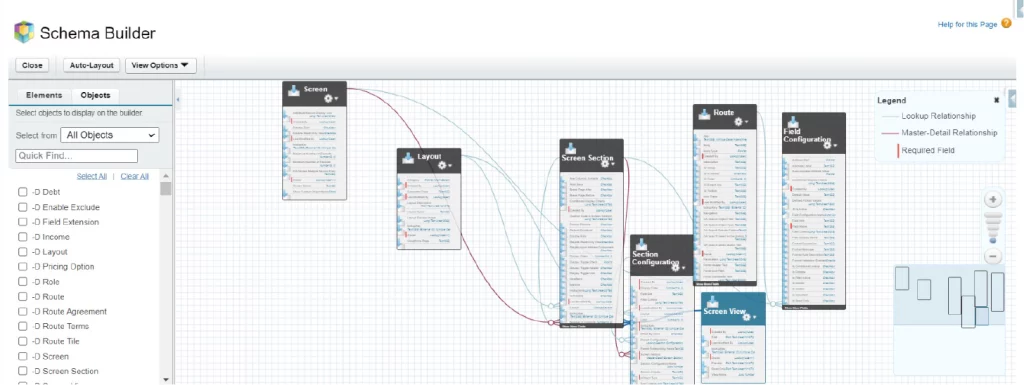
- Based on the relationships, determine the parent objects and child objects for the defined template
- Map all the required fields in the object fields section.
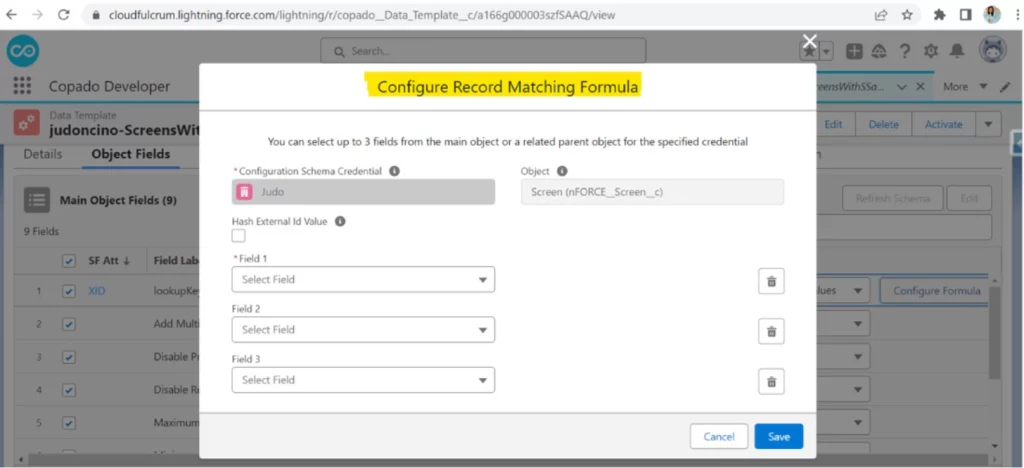
- To select a field as the external ID in Salesforce, follow these steps:
- Identify the fields in Salesforce designated as External ID fields.
- Choose the specific field you want to use as the external ID.
- Enable the “Use as External ID” option for the chosen field.
- When deploying records using Copado, the upsert method is utilized, which updates existing records in the destination organization using the external ID to prevent duplicates.
- If your records from the source organization already have values for the external ID fields:
- If the records from the source organization already have values for the external ID fields:
- Select “No Update” from the drop-down menu to prevent modification of existing values during deployment.
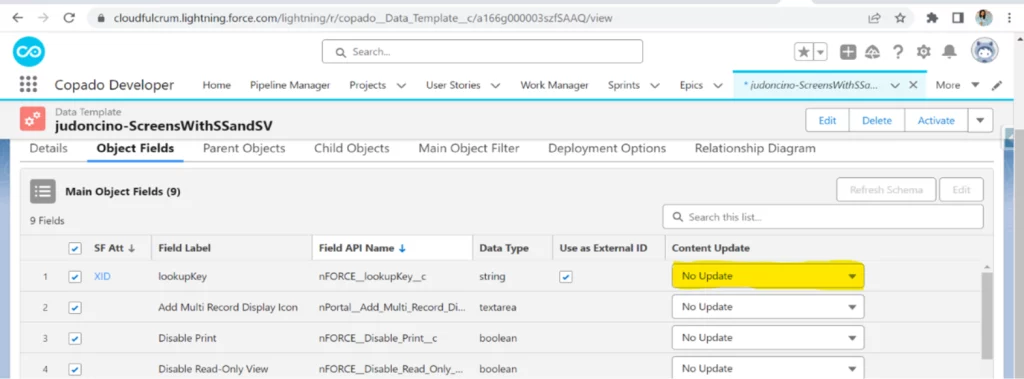
- Select “No Update” from the drop-down menu to prevent modification of existing values during deployment.
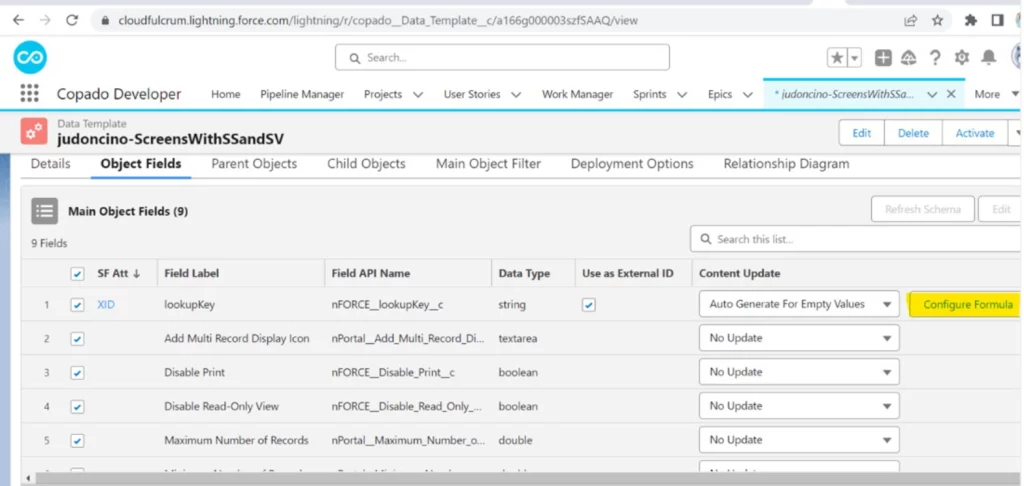
- If you don’t have a value for the External ID field or want Copado to generate one for you:
- Select “Auto Generate for Empty Values” from the drop-down menu. Copado will automatically create a value for the External ID field.
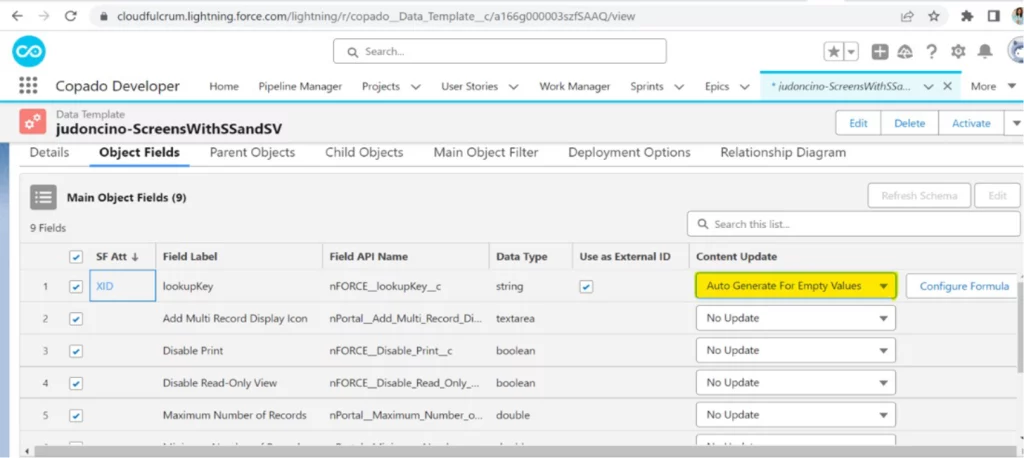
- Optionally, use the “Configure Formula” option to build the formula for generating the value.
- Select “Auto Generate for Empty Values” from the drop-down menu. Copado will automatically create a value for the External ID field.
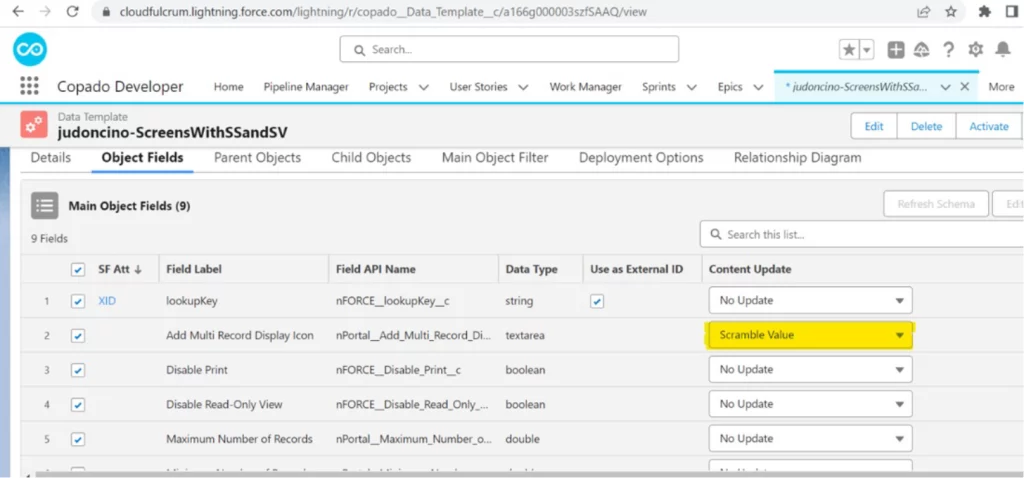
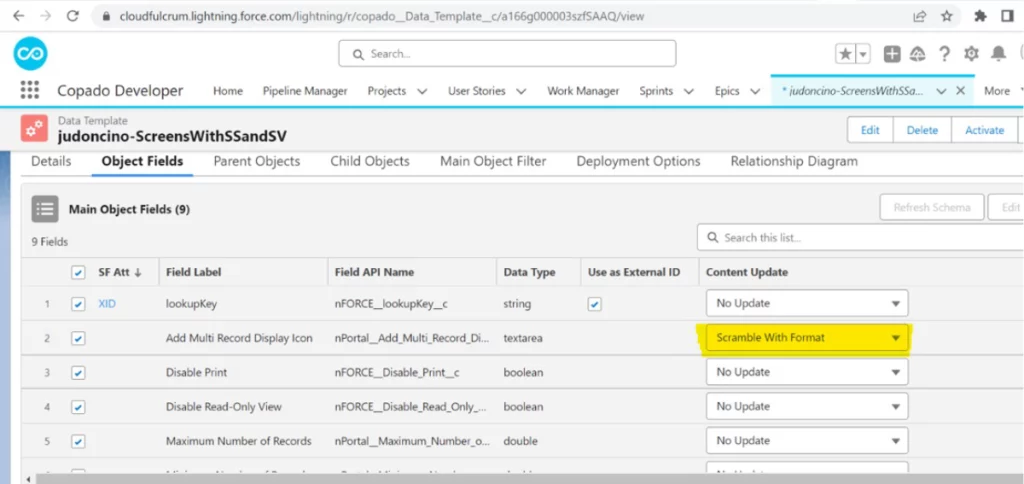
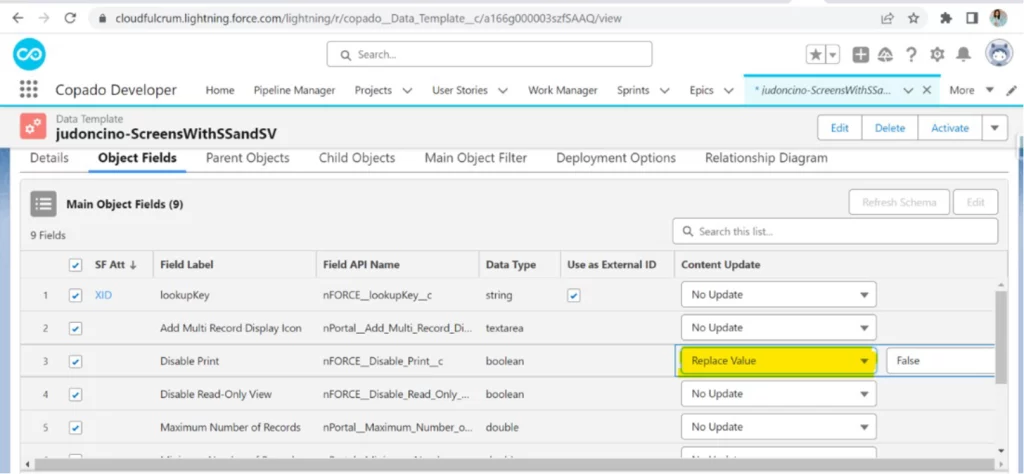
- The “Content Update” field is useful when transferring data from a production environment to a sandbox environment. In some cases, certain fields may contain sensitive data that you don’t want to deploy as is. In such scenarios, you have the following options:
- Scramble Value: Copado maintains the same number of characters as the original value but replaces the characters with random values.
- Scramble with Format: Copado replaces numbers and letters in the original value while preserving special characters.
- Replace Value: Enter a random value that Copado will use to replace the original value. It is highly recommended to provide value in the “Content Update” field to avoid future issues.
- Scramble Value: Copado maintains the same number of characters as the original value but replaces the characters with random values.
- After performing all these operations, go to the Relationship Diagram tab to compare the connections.

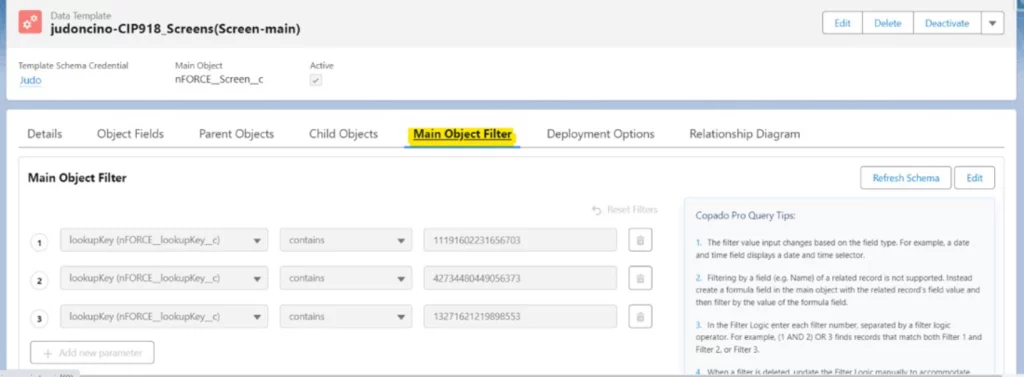
- Use the Main Object Filter tab to specify specific records to be fetched.
- Finally, click on Activate to make it ready for use.
How to Deploy the nCino Data Template?
To deploy the nCino Data Template, follow these steps:
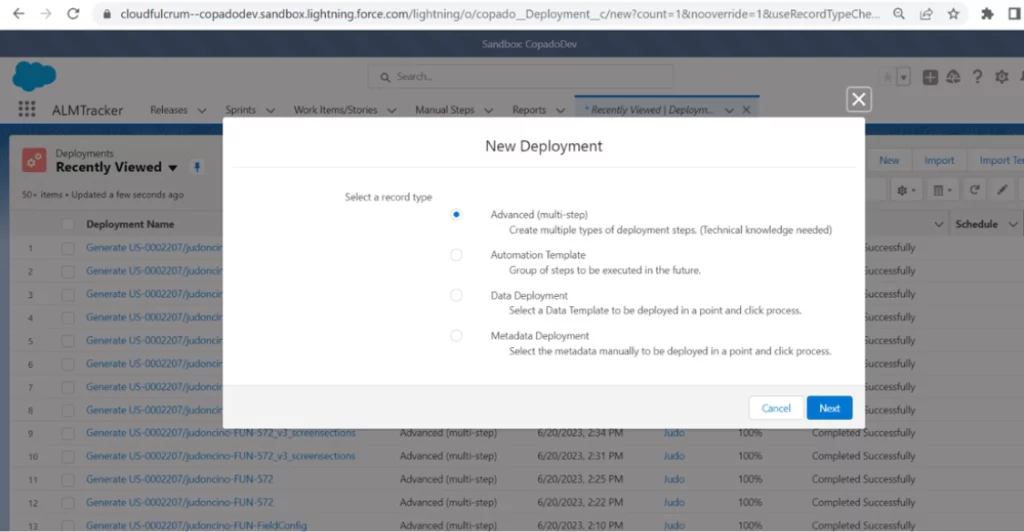
- Go to the Deployments section and create a new deployment by choosing the “Advanced – Multi Step” record type.

- Select the destination credential to which you want to deploy.
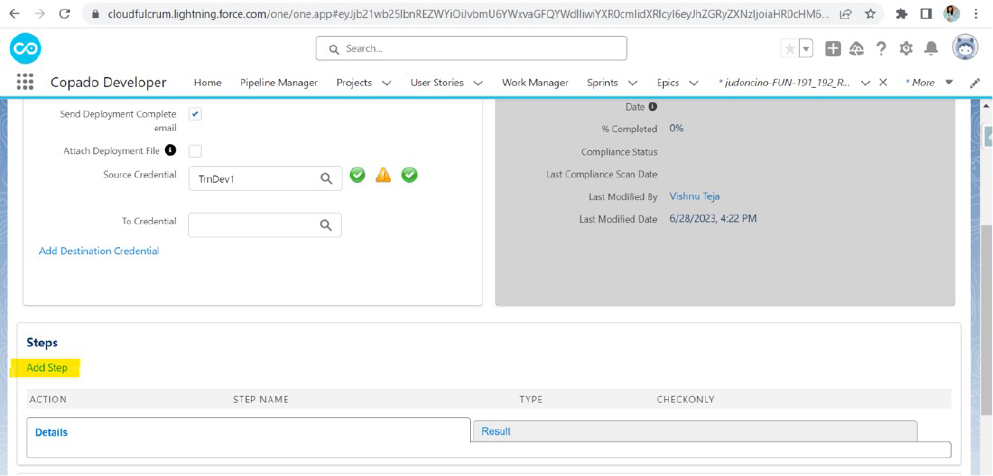
- In the deployment, you will find an “Add Step” button. Click on it.
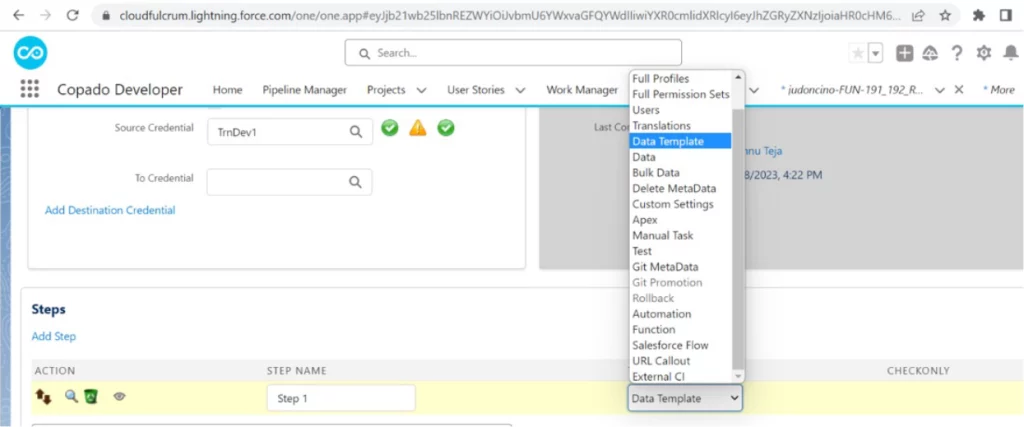
- Choose “Metadata” as the step type and select “Data Template” from the options.

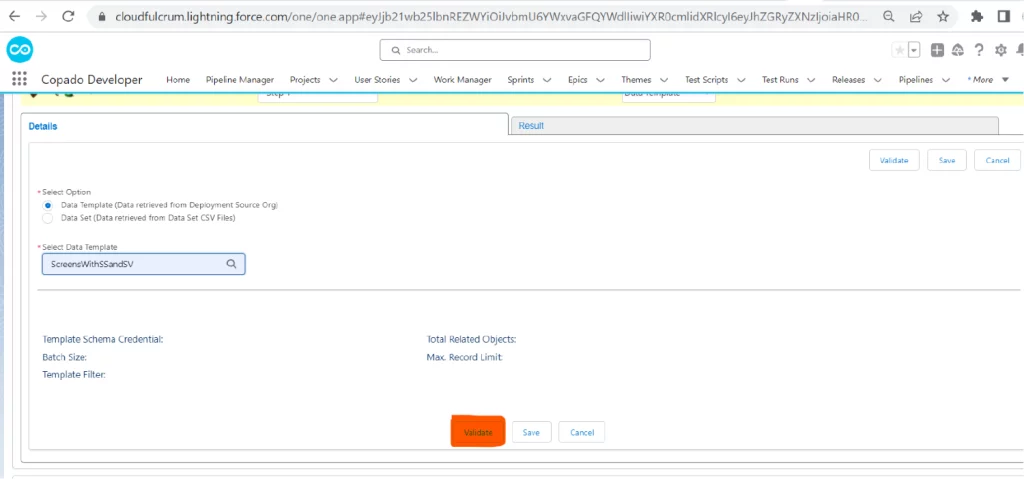
- Under “Select Data Template,” choose the desired template.

- Click on “Save “and then “Validate”.

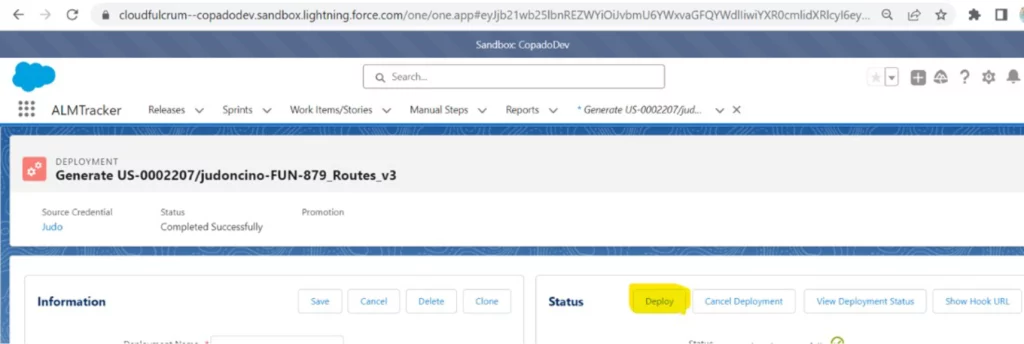
- If Validation is successful, Proceed to click on “Deploy” and then “Deploy All.”
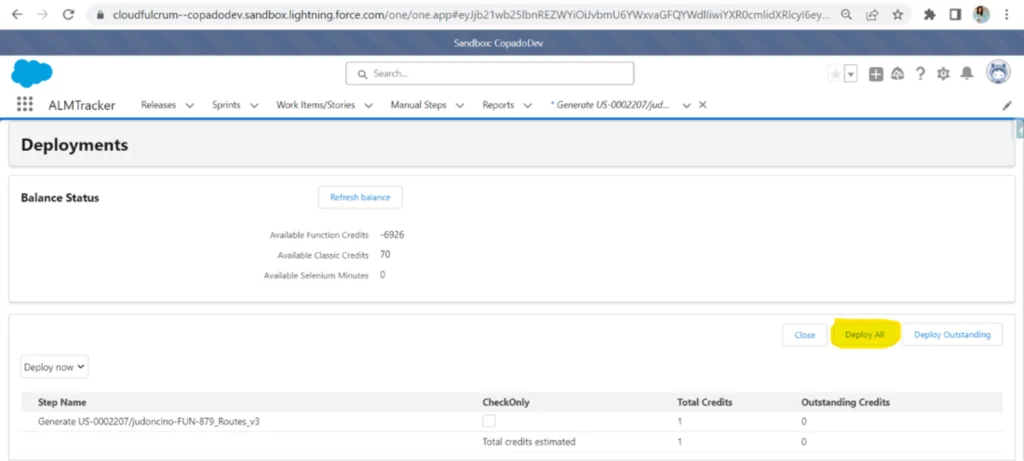
- Now it will be successfully deployed to the Destination successfully.
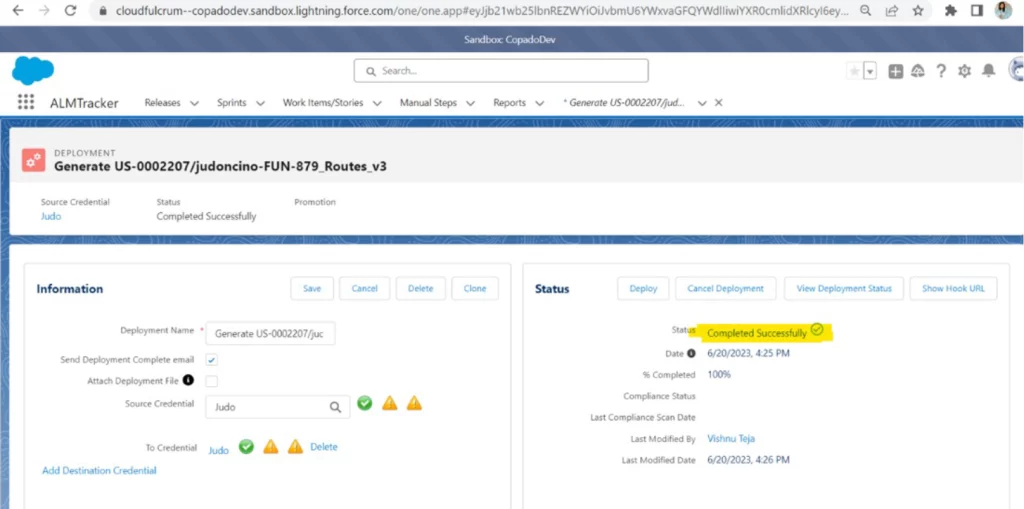
- To check whether the records have been successfully deployed, click on the flag icon to view the results.

What are Data Sets?
Data Sets allow you to retrieve data from your development/sandbox org. The retrieved data is static in nature, which means the generated data file is independent of changes from the source org’s record updates. There will be no synchronization of data from the source org to the generated data file. The data generated from Data Sets can be downloaded onto your local machine. It can be used for future reference, such as for analysis, reporting, or other purposes.
Data Sets also enable the deployment of data to higher or lower environments. They allow you to maintain different versions of your data for a specific point in time. If needed, you have the option to revert to an older version.
Use Cases of Data Sets
Here are some use cases of Data Sets:
Backup and Data Export: Data Sets are useful when you need to export your nCino data for backup purposes.
Data Migration: Data Sets facilitate the seamless migration of nCino data from one org to another.
Seeding Data for Testing: Lower environments like Developer Sandbox, Developer-Pro Sandbox, or Partial-Copy Sandbox often have limited storage and cannot sync nCino data from production completely. Data Sets offer a solution by allowing you to seed specific nCino data from production to the sandbox environment for testing purposes. This ensures you have relevant and representative data for accurate testing scenarios.
Data Relationships and Data Templates: When using Data Sets to seed nCino data onto environments, you don’t need to worry about maintaining data relationships. This is because Data Sets which are governed by Data Templates handle the necessary data dependencies and relationships automatically.
Maintaining Data Freshness: By using Data Sets you can maintain nCino Data Freshness (Fresh data for testing) into the sandbox, by seeding nCino data into the sandbox.
How to deploy nCino data templates using Data Sets?
Here are the steps for data deployment:
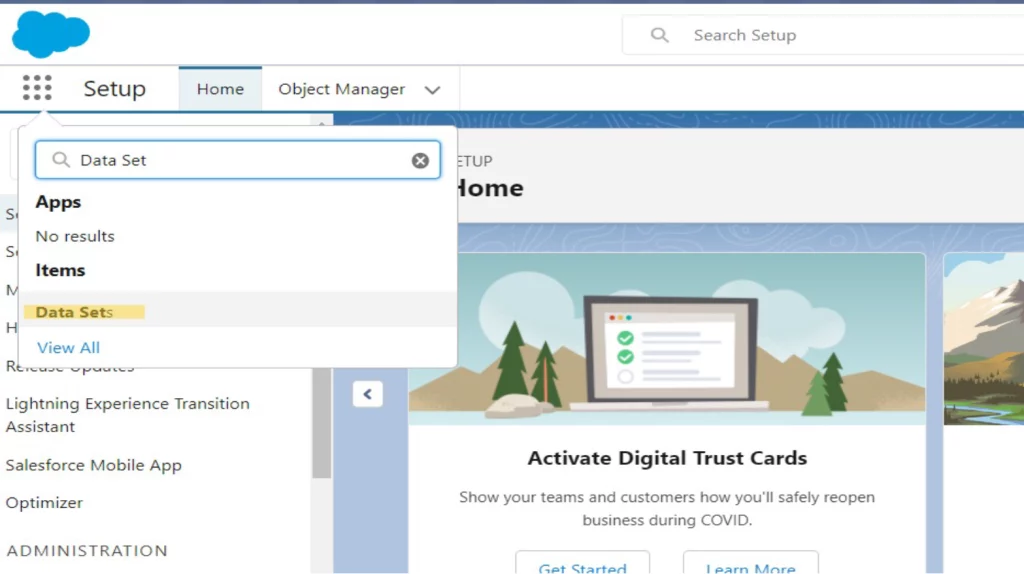
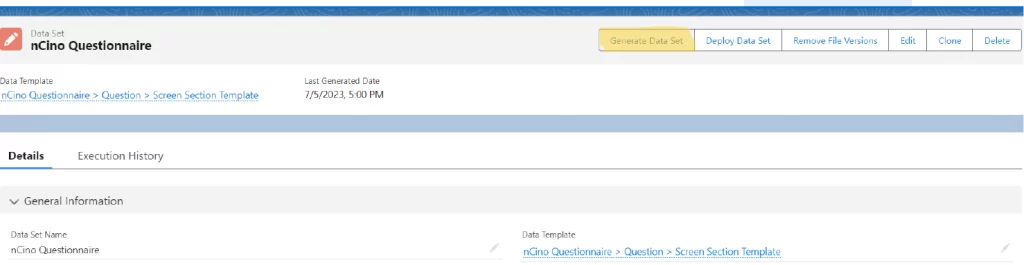
1.Open App launcher and search for Data Sets.
2. Go to Data Sets tab, click on “New” to create a new Data Set record.
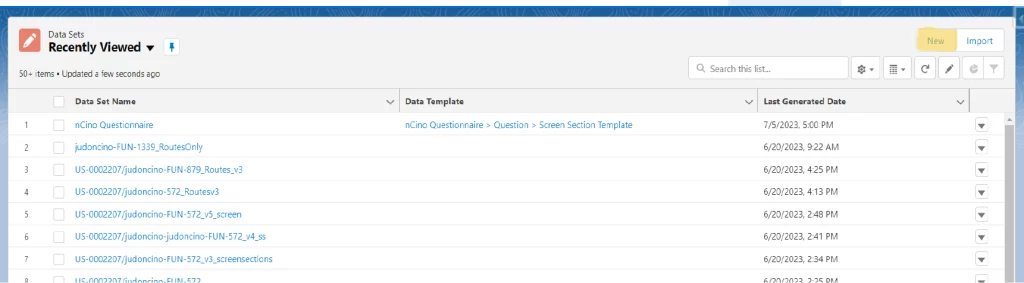
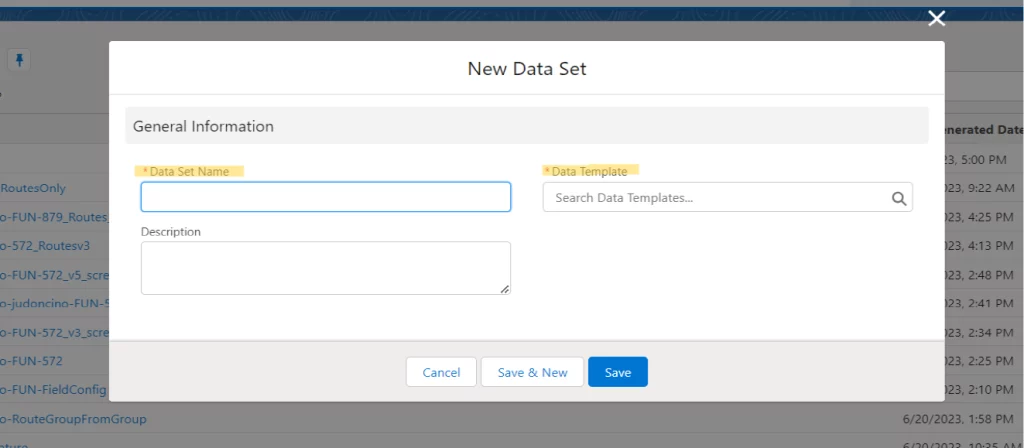
3. Enter the required details Data Set Name and select the required Data Template. Save the record.
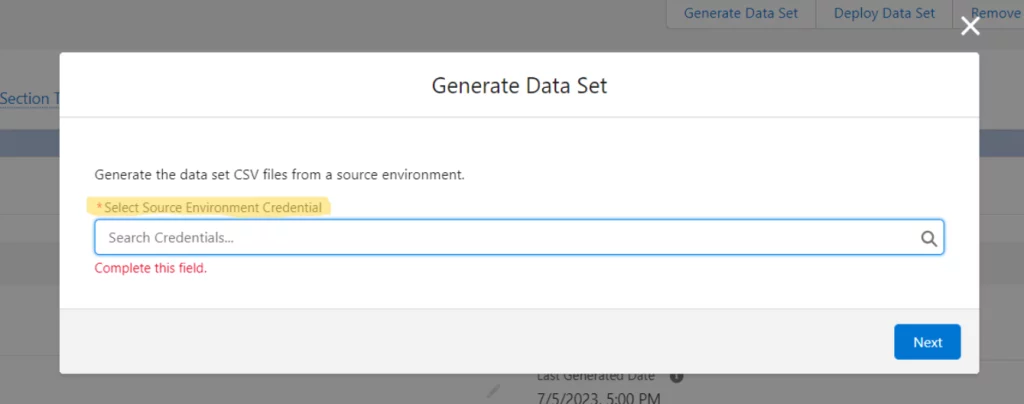
4. Within the Data Set record page, click on the “Generate Data Set” button. The functionality of this button is to initiate data retrieving process as per your Data Templates. But before the data retrieving process begins you need to select “Source Environment Credentials”. The option for selecting “Source Environment Credentials” will appear automatically through a pop-up window after clicking on “Generate Data Set” button.
5. Select the “Source Environment Credentials” where the data resides and click on “Next” button.
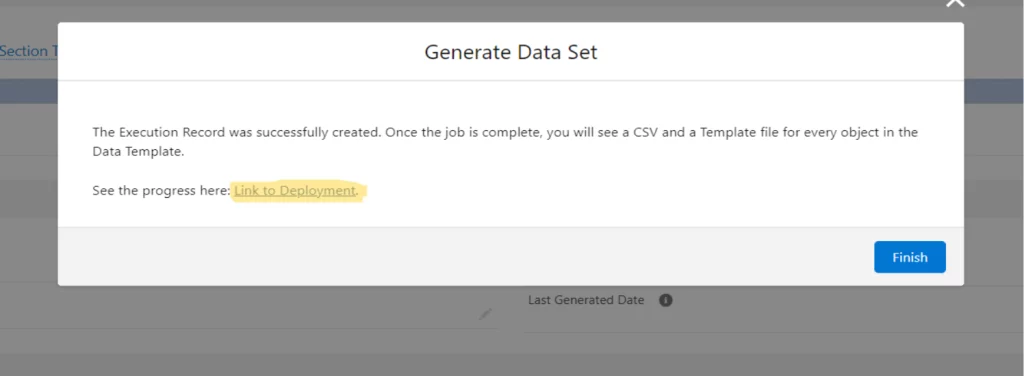
6. To check the status of the generated record, click on “Link to Deployment” which will take you to the deployment record page. Where you can find the progress status of record generating.
7. On the Deployment Page, under the “Steps” section, click on “View Result” to see the deployment details.
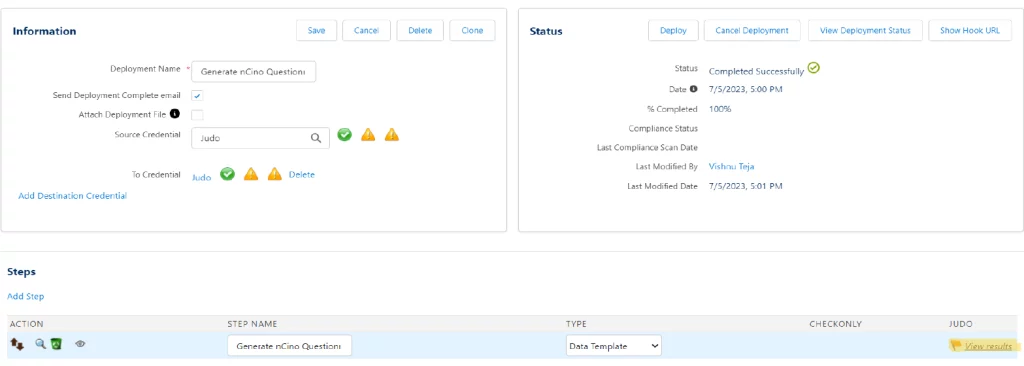
8. In the “Details” section, you can view the number of records that were retrieved successfully or failed during the deployment.

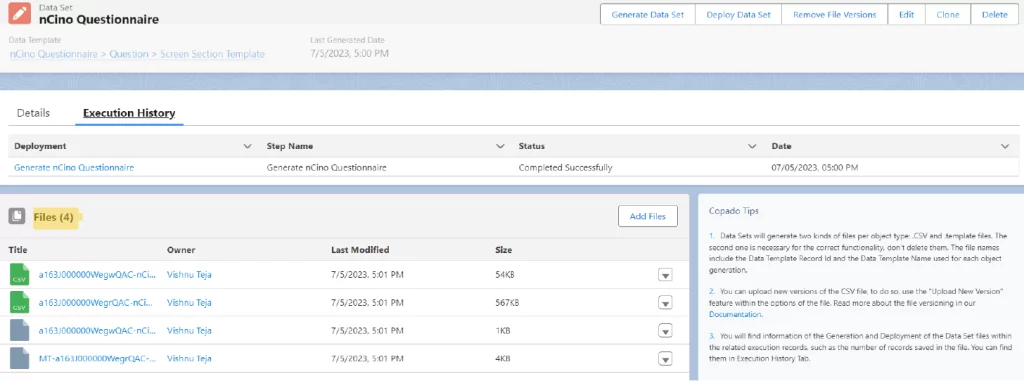
9. In the Data Set record page, navigate to the “Execution History” tab in the “Files” section. Here, you will find the CSV files containing all the generated data. You can also download the files onto your local machine.
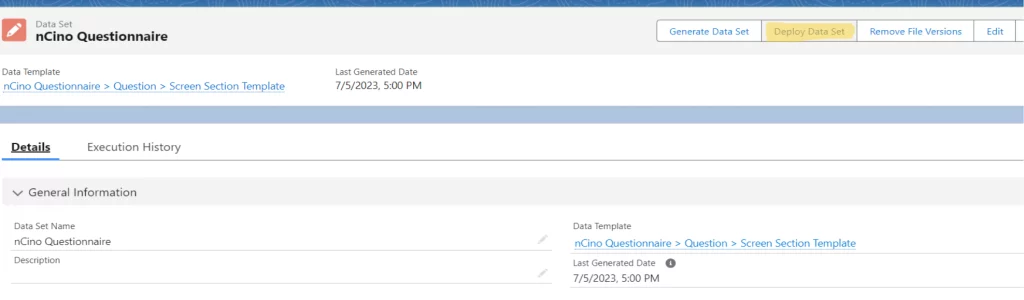
10. To deploy the data set to another environment, click on the “Deploy Data Set” button and select the destination environment where you want the data to be moved.
For more detailed instructions and personalized assistance, please contact support@staging.cloudfulcrum.com